Variational Autoencoders

generative-models
variational-autoencoders
latent-variable-models
ELBO
unsupervised-learning
An introduction to variational autoencoders (VAEs), covering autoencoders for dimensionality reduction, latent variable models, the evidence lower bound (ELBO), the reparameterization trick, and generative applications.
Published

March 16, 2026

NoneAbstract

This lesson introduces Variational Autoencoders (VAEs), a powerful class of generative models that learn to model complex data distributions through latent variables. We begin by motivating the problem through classical autoencoders and dimensionality reduction, then show why autoencoders alone are insufficient for generation. We introduce the latent variable model framework using mixture of Gaussians as an illustrative example, and then develop the full nonlinear latent variable model that underlies the VAE. We derive the Evidence Lower Bound (ELBO) training objective using Jensen’s inequality, explain the reparameterization trick that makes gradient-based training possible, and describe the complete VAE architecture. Finally, we discuss how trained VAEs are used for generation, resynthesis, and disentanglement.

CREATED AT: 2026-03-16

Introduction to Encoder-Decoder Architectures

Before diving into variational autoencoders, we need to understand the simpler architecture that inspired them: the autoencoder. Autoencoders address a fundamental problem in machine learning — how to find compact representations of high-dimensional data — and their limitations naturally motivate the probabilistic approach taken by VAEs.

Autoencoders

The Dimensionality Reduction Problem

Real-world data such as images, audio, and text often lives in very high-dimensional spaces. An image of size \(28 \times 28\) has 784 pixel values; a colour photograph might have millions. Yet the meaningful variation in such data typically occupies a much lower-dimensional subspace. For example, handwritten digits vary in stroke width, slant, and size — a handful of factors, not hundreds of independent pixel values.

Dimensionality reduction is the problem of finding a low-dimensional representation \(\mathbf{z} \in \mathbb{R}^{D_z}\) of a high-dimensional data point \(\mathbf{x} \in \mathbb{R}^{D_x}\), where \(D_z \ll D_x\), such that the essential information in \(\mathbf{x}\) is preserved.

Classical methods such as Principal Component Analysis (PCA) achieve this through linear projections. Autoencoders generalise this idea by using nonlinear mappings parameterised by neural networks.

The Autoencoder Architecture

An autoencoder consists of two neural networks:

  • Encoder \(\mathbf{g}[\mathbf{x}, \boldsymbol{\theta}]\): maps the input \(\mathbf{x} \in \mathbb{R}^{D_x}\) to a low-dimensional latent code (or bottleneck) \(\mathbf{z} \in \mathbb{R}^{D_z}\).
  • Decoder \(\mathbf{f}[\mathbf{z}, \boldsymbol{\phi}]\): maps the latent code \(\mathbf{z}\) back to a reconstruction \(\hat{\mathbf{x}} \in \mathbb{R}^{D_x}\).

The pipeline is:

\[ \mathbf{x} \xrightarrow{\text{Encoder}} \mathbf{z} \xrightarrow{\text{Decoder}} \hat{\mathbf{x}} \]

The network is trained to minimise the reconstruction loss — typically the mean squared error between the input and its reconstruction:

\[ \mathcal{L} = \frac{1}{N} \sum_{i=1}^{N} \|\mathbf{x}_i - \hat{\mathbf{x}}_i\|^2 = \frac{1}{N} \sum_{i=1}^{N} \|\mathbf{x}_i - \mathbf{f}[\mathbf{g}[\mathbf{x}_i, \boldsymbol{\theta}], \boldsymbol{\phi}]\|^2. \]

Unsupervised Learning

A key property of autoencoders is that they are trained without labels. The training signal comes entirely from the data itself: the input \(\mathbf{x}\) serves as both the input and the target. This makes autoencoders an unsupervised learning method — we only need a collection of data points \(\{\mathbf{x}_1, \mathbf{x}_2, \dots, \mathbf{x}_N\}\), with no accompanying annotations or categories.

The bottleneck \(\mathbf{z}\) forces the network to learn a compressed representation that captures the most important features of the data. If the encoder and decoder are linear, the autoencoder recovers PCA. With nonlinear networks, the autoencoder can capture more complex structure.

NoteDefinition

Autoencoder: A neural network consisting of an encoder \(\mathbf{g}\) and a decoder \(\mathbf{f}\) trained to reconstruct its input through a low-dimensional bottleneck. The training is unsupervised — no labels are needed. The bottleneck representation \(\mathbf{z}\) serves as a compressed code for the data.

Show code
import matplotlib.pyplot as plt
import matplotlib.patches as mpatches
import numpy as np

def draw_box(ax, xy, w, h, text, color="#4A90D9", fontsize=9, text_color="white"):
    rect = mpatches.FancyBboxPatch(xy, w, h, boxstyle="round,pad=0.06",
                                    facecolor=color, edgecolor="black", linewidth=1.2)
    ax.add_patch(rect)
    ax.text(xy[0] + w/2, xy[1] + h/2, text, ha="center", va="center",
            fontsize=fontsize, fontweight="bold", color=text_color)

def draw_arrow(ax, start, end):
    ax.annotate("", xy=end, xytext=start,
                arrowprops=dict(arrowstyle="-|>", color="black", lw=1.5))

fig, ax = plt.subplots(figsize=(9, 2.5))
ax.set_xlim(-0.5, 10)
ax.set_ylim(-0.5, 2.5)
ax.set_aspect("equal")
ax.axis("off")
ax.set_title("Autoencoder Architecture", fontsize=13, fontweight="bold", pad=10)

# Input
draw_box(ax, (0, 0.5), 1.5, 1.0, r"$\mathbf{x}$" + "\n" + r"$\mathbb{R}^{D_x}$",
         color="#6C757D", fontsize=10)

# Encoder
draw_box(ax, (2.2, 0.5), 1.8, 1.0, "Encoder\n" + r"$\mathbf{g}[\cdot,\theta]$",
         color="#2E86C1", fontsize=9)
draw_arrow(ax, (1.5, 1.0), (2.2, 1.0))

# Bottleneck
draw_box(ax, (4.7, 0.65), 1.2, 0.7, r"$\mathbf{z}$" + "\n" + r"$\mathbb{R}^{D_z}$",
         color="#E74C3C", fontsize=10)
draw_arrow(ax, (4.0, 1.0), (4.7, 1.0))

# Decoder
draw_box(ax, (6.6, 0.5), 1.8, 1.0, "Decoder\n" + r"$\mathbf{f}[\cdot,\phi]$",
         color="#27AE60", fontsize=9)
draw_arrow(ax, (5.9, 1.0), (6.6, 1.0))

# Output
draw_box(ax, (9.1, 0.5), 1.5, 1.0, r"$\hat{\mathbf{x}}$" + "\n" + r"$\mathbb{R}^{D_x}$",
         color="#6C757D", fontsize=10)
draw_arrow(ax, (8.4, 1.0), (9.1, 1.0))

# Dimension labels
ax.text(5.3, 0.35, r"$D_z \ll D_x$", ha="center", fontsize=9, style="italic", color="#C0392B")

fig.tight_layout()
plt.show()

From Autoencoders to Generative Models

Autoencoders are excellent for compression and representation learning, but they have a fundamental limitation when it comes to generation.

Limitations of Autoencoders for Generation

Suppose we have trained an autoencoder on a dataset of face images. The decoder \(\mathbf{f}[\mathbf{z}, \boldsymbol{\phi}]\) maps any latent vector \(\mathbf{z}\) to an image. Could we generate new faces by sampling random \(\mathbf{z}\) vectors and decoding them?

In principle, yes — but in practice, the results are poor. The problem is that the autoencoder has no incentive to organise the latent space in any particular way. The encoder maps training data to scattered, irregular regions of the latent space, and the decoder only learns to produce meaningful outputs for the specific latent codes it has seen during training. If we sample a \(\mathbf{z}\) that falls in an “empty” region of the latent space, the decoder will produce garbage.

To use a decoder for generation, we need to know which latent codes are valid — that is, we need a probability distribution over the latent space. This motivates a fundamental shift: instead of learning a deterministic mapping, we should learn a probabilistic model.

ImportantImportant

The key limitation of standard autoencoders for generation is that the latent space has no known distribution. We cannot sample from it meaningfully. To build a generative model, we must redefine the problem as learning a probability distribution \(Pr(\mathbf{x})\) over the data.

The Latent Variable Model Framework

Instead of learning a deterministic bottleneck, latent variable models take an indirect approach to describing the data distribution \(Pr(\mathbf{x})\). They introduce an unobserved (latent) variable \(\mathbf{z}\) and define a joint distribution \(Pr(\mathbf{x}, \mathbf{z})\). The data probability is then recovered by marginalising over the latent variable:

\[ Pr(\mathbf{x}) = \int Pr(\mathbf{x}, \mathbf{z})\, d\mathbf{z} = \int Pr(\mathbf{x} | \mathbf{z}) \cdot Pr(\mathbf{z})\, d\mathbf{z}. \]

This decomposition is powerful because relatively simple expressions for the likelihood \(Pr(\mathbf{x} | \mathbf{z})\) and the prior \(Pr(\mathbf{z})\) can combine to define complex, multi-modal distributions \(Pr(\mathbf{x})\).

Example: Mixture of Gaussians

The simplest illustration of a latent variable model is the mixture of Gaussians (MoG). Here the latent variable \(z\) is discrete, taking values \(z \in \{1, 2, \dots, N\}\) with probabilities:

\[ Pr(z = n) = \lambda_n, \qquad \text{where } \sum_{n=1}^{N} \lambda_n = 1. \]

The likelihood of the data given the latent variable is a Gaussian:

\[ Pr(x | z = n) = \text{Norm}_x\!\left[\mu_n, \sigma_n^2\right]. \]

The marginal distribution over \(x\) is obtained by summing over all possible values of \(z\):

\[ Pr(x) = \sum_{n=1}^{N} Pr(x, z=n) = \sum_{n=1}^{N} Pr(x | z=n) \cdot Pr(z=n) = \sum_{n=1}^{N} \lambda_n \cdot \text{Norm}_x\!\left[\mu_n, \sigma_n^2\right]. \]

From simple component distributions (Gaussians) and a simple prior (categorical), we can describe a complex multi-modal probability distribution. Each component Gaussian captures one “mode” of the data, and the mixing weights \(\lambda_n\) determine how much each mode contributes.

Show code
import numpy as np
import matplotlib.pyplot as plt

# --- Mixture of Gaussians: demonstration ---
# Define a mixture of 3 Gaussians
means = [-2.0, 1.0, 4.0]
stds = [0.5, 1.0, 0.7]
weights = [0.3, 0.4, 0.3]

x = np.linspace(-5, 8, 500)

def gaussian(x, mu, sigma):
    return (1 / (sigma * np.sqrt(2 * np.pi))) * np.exp(-0.5 * ((x - mu) / sigma) ** 2)

fig, axes = plt.subplots(1, 2, figsize=(10, 3.5))

# Left: individual components
for i, (mu, sigma, w) in enumerate(zip(means, stds, weights)):
    axes[0].plot(x, w * gaussian(x, mu, sigma), '--', label=f'$\\lambda_{i+1}$ Norm$({mu}, {sigma}^2)$')
axes[0].set_title('Individual Gaussian components (weighted)', fontsize=11)
axes[0].set_xlabel('$x$')
axes[0].set_ylabel('$\\lambda_n \\cdot Pr(x|z=n)$')
axes[0].legend(fontsize=8)

# Right: mixture distribution
mixture = sum(w * gaussian(x, mu, sigma) for w, mu, sigma in zip(weights, means, stds))
axes[1].plot(x, mixture, 'k-', linewidth=2, label='Mixture $Pr(x)$')
axes[1].fill_between(x, mixture, alpha=0.2, color='steelblue')
axes[1].set_title('Marginal distribution $Pr(x) = \\sum_n \\lambda_n \\cdot \\mathrm{Norm}(\\mu_n, \\sigma_n^2)$', fontsize=11)
axes[1].set_xlabel('$x$')
axes[1].set_ylabel('$Pr(x)$')
axes[1].legend(fontsize=9)

fig.tight_layout()
plt.show()

Sampling from a Mixture of Gaussians

Sampling from a mixture of Gaussians is a two-stage process that mirrors the latent variable model structure:

  1. Sample the latent variable: Draw \(z \sim \text{Categorical}(\lambda_1, \dots, \lambda_N)\) to select which component to use.
  2. Sample the data: Draw \(x \sim \text{Norm}(\mu_z, \sigma_z^2)\) from the selected Gaussian component.

This is an example of ancestral sampling — we sample the latent variable first (from the prior), then sample the observed variable conditioned on the latent.

Show code
import numpy as np
import matplotlib.pyplot as plt

# --- Sampling from a mixture of Gaussians ---
np.random.seed(42)

means = np.array([-2.0, 1.0, 4.0])
stds = np.array([0.5, 1.0, 0.7])
weights = np.array([0.3, 0.4, 0.3])

N_samples = 1000

# Step 1: Sample latent variable z (which component)
z_samples = np.random.choice(len(weights), size=N_samples, p=weights)

# Step 2: Sample x from the selected Gaussian
x_samples = np.array([np.random.normal(means[z], stds[z]) for z in z_samples])

# Plot the samples as a histogram and overlay the true density
fig, ax = plt.subplots(figsize=(7, 3.5))
ax.hist(x_samples, bins=60, density=True, alpha=0.5, color='steelblue', label='Sampled data')

x_grid = np.linspace(-5, 8, 500)
def gaussian(x, mu, sigma):
    return (1 / (sigma * np.sqrt(2 * np.pi))) * np.exp(-0.5 * ((x - mu) / sigma) ** 2)
mixture = sum(w * gaussian(x_grid, mu, sigma) for w, mu, sigma in zip(weights, means, stds))
ax.plot(x_grid, mixture, 'k-', linewidth=2, label='True $Pr(x)$')

ax.set_xlabel('$x$')
ax.set_ylabel('Density')
ax.set_title(f'Ancestral sampling from a mixture of Gaussians ($N = {N_samples}$)', fontsize=11)
ax.legend()
fig.tight_layout()
plt.show()

Training a Mixture of Gaussians (Unsupervised)

A mixture of Gaussians can be trained from data without labels using maximum likelihood estimation. Given training data \(\{x_1, x_2, \dots, x_I\}\), we seek parameters \(\{\lambda_n, \mu_n, \sigma_n^2\}_{n=1}^{N}\) that maximise:

\[ \hat{\boldsymbol{\theta}} = \arg\max_{\boldsymbol{\theta}} \sum_{i=1}^{I} \log Pr(x_i | \boldsymbol{\theta}) = \arg\max_{\boldsymbol{\theta}} \sum_{i=1}^{I} \log \left[ \sum_{n=1}^{N} \lambda_n \cdot \text{Norm}_{x_i}\!\left[\mu_n, \sigma_n^2\right] \right]. \]

This is solved iteratively using the Expectation-Maximisation (EM) algorithm. The critical point is that no labels are needed — the algorithm alternates between:

  • E-step: For each data point \(x_i\), compute the posterior probability that it belongs to each component \(n\) (the “responsibility” of each component for that data point).
  • M-step: Update the parameters \(\lambda_n, \mu_n, \sigma_n^2\) using these responsibilities as soft assignments.

The latent variable \(z\) acts as a hidden label that the algorithm infers during training. This is the essence of unsupervised learning with latent variable models: the model discovers structure (clusters, in this case) without being told what to look for.

ImportantImportant

The mixture of Gaussians demonstrates the core idea behind latent variable models: a simple prior \(Pr(z)\) combined with a simple conditional \(Pr(x|z)\) can describe complex data distributions \(Pr(x)\). Training is unsupervised — the latent variable \(z\) acts as a hidden label that the model infers from the data.


Variational Autoencoders

The mixture of Gaussians uses a discrete latent variable with a finite number of components. The nonlinear latent variable model that underlies the VAE generalises this to continuous, multivariate latent variables and uses deep neural networks to define the relationships between latent and observed variables.

Nonlinear Latent Variable Models

In the nonlinear latent variable model, both the data \(\mathbf{x} \in \mathbb{R}^{D_x}\) and the latent variable \(\mathbf{z} \in \mathbb{R}^{D_z}\) are continuous and multivariate. The model is defined by two components:

Prior: The latent variable follows a standard multivariate normal:

\[ Pr(\mathbf{z}) = \text{Norm}_{\mathbf{z}}[\mathbf{0}, \mathbf{I}]. \]

Likelihood (Decoder): The data given the latent variable is normally distributed, with mean given by a nonlinear function of \(\mathbf{z}\):

\[ Pr(\mathbf{x} | \mathbf{z}, \boldsymbol{\phi}) = \text{Norm}_{\mathbf{x}}\!\left[\mathbf{f}[\mathbf{z}, \boldsymbol{\phi}],\, \sigma^2 \mathbf{I}\right], \]

where \(\mathbf{f}[\mathbf{z}, \boldsymbol{\phi}]\) is a deep neural network with parameters \(\boldsymbol{\phi}\). This network is the decoder: it maps from the latent space to the data space. The latent variable \(\mathbf{z}\) is lower-dimensional than the data \(\mathbf{x}\). The decoder captures the important aspects of the data, and the remaining unmodeled aspects are ascribed to the noise \(\sigma^2 \mathbf{I}\).

The marginal data probability is obtained by integrating out \(\mathbf{z}\):

\[ Pr(\mathbf{x} | \boldsymbol{\phi}) = \int Pr(\mathbf{x} | \mathbf{z}, \boldsymbol{\phi}) \cdot Pr(\mathbf{z})\, d\mathbf{z} = \int \text{Norm}_{\mathbf{x}}\!\left[\mathbf{f}[\mathbf{z}, \boldsymbol{\phi}],\, \sigma^2 \mathbf{I}\right] \cdot \text{Norm}_{\mathbf{z}}[\mathbf{0}, \mathbf{I}]\, d\mathbf{z}. \]

This can be viewed as an infinite mixture of spherical Gaussians, where the weights are \(Pr(\mathbf{z})\) and the means are given by the network outputs \(\mathbf{f}[\mathbf{z}, \boldsymbol{\phi}]\).

The Encoder and Decoder as Probabilistic Models

The VAE introduces a second network — the encoder — that approximates the posterior distribution of the latent variable given the data. This gives us two probabilistic models:

Component Network Distribution Role
Decoder \(\mathbf{f}[\mathbf{z}, \boldsymbol{\phi}]\) \(Pr(\mathbf{x} \mid \mathbf{z}, \boldsymbol{\phi}) = \text{Norm}_{\mathbf{x}}[\mathbf{f}[\mathbf{z}, \boldsymbol{\phi}], \sigma^2\mathbf{I}]\) Maps latent codes to data
Encoder \(\mathbf{g}[\mathbf{x}, \boldsymbol{\theta}]\) \(q(\mathbf{z} \mid \mathbf{x}, \boldsymbol{\theta}) = \text{Norm}_{\mathbf{z}}[\mathbf{g}_{\boldsymbol{\mu}}[\mathbf{x}, \boldsymbol{\theta}],\, \mathbf{g}_{\boldsymbol{\Sigma}}[\mathbf{x}, \boldsymbol{\theta}]]\) Maps data to latent distribution

The encoder does not produce a single latent code. Instead, it outputs the parameters of a normal distribution — a mean \(\boldsymbol{\mu}\) and a diagonal covariance \(\boldsymbol{\Sigma}\) — for each input \(\mathbf{x}\). This probabilistic encoding is what distinguishes the VAE from a standard autoencoder.

Generation from the Nonlinear Latent Variable Model

A new data point \(\mathbf{x}^*\) can be generated using ancestral sampling:

  1. Sample from the prior: Draw \(\mathbf{z}^* \sim Pr(\mathbf{z}) = \text{Norm}_{\mathbf{z}}[\mathbf{0}, \mathbf{I}]\).
  2. Decode: Compute the mean \(\mathbf{f}[\mathbf{z}^*, \boldsymbol{\phi}]\) using the decoder network.
  3. Sample the data: Draw \(\mathbf{x}^* \sim Pr(\mathbf{x} | \mathbf{z}^*, \boldsymbol{\phi}) = \text{Norm}_{\mathbf{x}}[\mathbf{f}[\mathbf{z}^*, \boldsymbol{\phi}], \sigma^2 \mathbf{I}]\).

Both the prior and the likelihood are normal distributions, so sampling is straightforward. If we repeat this process many times, we recover the full data distribution \(Pr(\mathbf{x} | \boldsymbol{\phi})\).

Show code
import matplotlib.pyplot as plt
import matplotlib.patches as mpatches

def draw_box(ax, xy, w, h, text, color="#4A90D9", fontsize=9, text_color="white"):
    rect = mpatches.FancyBboxPatch(xy, w, h, boxstyle="round,pad=0.06",
                                    facecolor=color, edgecolor="black", linewidth=1.2)
    ax.add_patch(rect)
    ax.text(xy[0] + w/2, xy[1] + h/2, text, ha="center", va="center",
            fontsize=fontsize, fontweight="bold", color=text_color)

def draw_arrow(ax, start, end):
    ax.annotate("", xy=end, xytext=start,
                arrowprops=dict(arrowstyle="-|>", color="black", lw=1.5))

fig, ax = plt.subplots(figsize=(10, 2.5))
ax.set_xlim(-0.5, 11.5)
ax.set_ylim(-0.5, 2.5)
ax.set_aspect("equal")
ax.axis("off")
ax.set_title("Generation from the Nonlinear Latent Variable Model", fontsize=12, fontweight="bold", pad=10)

# Prior
draw_box(ax, (0, 0.5), 2.2, 1.0, "Prior\n$Pr(\\mathbf{z}) = \\mathcal{N}(0, I)$",
         color="#2E86C1", fontsize=8)

# z*
draw_box(ax, (3.0, 0.65), 1.2, 0.7, r"$\mathbf{z}^*$",
         color="#E74C3C", fontsize=11)
draw_arrow(ax, (2.2, 1.0), (3.0, 1.0))
ax.text(2.6, 1.5, "sample", ha="center", fontsize=8, style="italic", color="#555")

# Decoder
draw_box(ax, (5.0, 0.5), 2.2, 1.0, "Decoder\n$\\mathbf{f}[\\mathbf{z}^*, \\phi]$",
         color="#27AE60", fontsize=9)
draw_arrow(ax, (4.2, 1.0), (5.0, 1.0))

# Likelihood
draw_box(ax, (8.0, 0.5), 2.5, 1.0, "$Pr(\\mathbf{x}|\\mathbf{z}^*,\\phi)$\n$= \\mathcal{N}(\\mathbf{f}[\\mathbf{z}^*,\\phi], \\sigma^2 I)$",
         color="#8E44AD", fontsize=8)
draw_arrow(ax, (7.2, 1.0), (8.0, 1.0))

fig.tight_layout()
plt.show()

NoteDefinition

Nonlinear Latent Variable Model: A generative model where:

  • The prior \(Pr(\mathbf{z}) = \text{Norm}_{\mathbf{z}}[\mathbf{0}, \mathbf{I}]\) is a standard normal.
  • The likelihood \(Pr(\mathbf{x}|\mathbf{z}, \boldsymbol{\phi}) = \text{Norm}_{\mathbf{x}}[\mathbf{f}[\mathbf{z}, \boldsymbol{\phi}], \sigma^2\mathbf{I}]\) is parameterised by a deep network.
  • The marginal \(Pr(\mathbf{x}|\boldsymbol{\phi})\) is an infinite mixture of Gaussians, which can represent arbitrarily complex distributions.

Training of VAEs

We now turn to the central challenge: how do we train the nonlinear latent variable model? The answer involves a beautiful interplay between probabilistic reasoning and neural network optimisation.

The True Training Objective

Given a training dataset \(\{\mathbf{x}_i\}_{i=1}^{I}\), we want to find parameters \(\boldsymbol{\phi}\) that maximise the log-likelihood:

\[ \hat{\boldsymbol{\phi}} = \arg\max_{\boldsymbol{\phi}} \left[\sum_{i=1}^{I} \log Pr(\mathbf{x}_i | \boldsymbol{\phi})\right], \]

where:

\[ Pr(\mathbf{x}_i | \boldsymbol{\phi}) = \int \text{Norm}_{\mathbf{x}_i}\!\left[\mathbf{f}[\mathbf{z}, \boldsymbol{\phi}], \sigma^2 \mathbf{I}\right] \cdot \text{Norm}_{\mathbf{z}}[\mathbf{0}, \mathbf{I}]\, d\mathbf{z}. \]

Unfortunately, this is intractable. The integral has no closed-form expression and no easy way to evaluate it for a particular value of \(\mathbf{x}\). The nonlinear function \(\mathbf{f}[\mathbf{z}, \boldsymbol{\phi}]\) inside the Gaussian makes the integral impossible to compute analytically.

The Variational Lower Bound

Since we cannot maximise the log-likelihood directly, we instead maximise a lower bound on it. This lower bound is a function that is always less than or equal to the log-likelihood for any given value of \(\boldsymbol{\phi}\), and it will also depend on a second set of parameters \(\boldsymbol{\theta}\). If we can make the lower bound as large as possible, we push the log-likelihood upward as well.

To derive this bound, we need Jensen’s inequality.

Jensen’s Inequality

Jensen’s inequality states that for a concave function \(g[\bullet]\), the function of the expectation is greater than or equal to the expectation of the function:

\[ g\!\left[\mathbb{E}[y]\right] \geq \mathbb{E}\!\left[g[y]\right]. \]

Since the logarithm is a concave function, we have:

\[ \log\!\left[\mathbb{E}[y]\right] \geq \mathbb{E}\!\left[\log[y]\right], \]

or writing out the expectation explicitly:

\[ \log \left[\int Pr(y) \cdot h[y]\, dy\right] \geq \int Pr(y) \log\!\left[h[y]\right] dy, \]

where \(h[y]\) is any non-negative function of \(y\).

Deriving the ELBO

We now use Jensen’s inequality to derive the lower bound for the log-likelihood. We start by multiplying and dividing the integrand by an arbitrary probability distribution \(q(\mathbf{z})\) over the latent variables:

\[ \log\!\left[Pr(\mathbf{x} | \boldsymbol{\phi})\right] = \log \left[\int Pr(\mathbf{x}, \mathbf{z} | \boldsymbol{\phi})\, d\mathbf{z}\right] = \log \left[\int q(\mathbf{z}) \frac{Pr(\mathbf{x}, \mathbf{z} | \boldsymbol{\phi})}{q(\mathbf{z})}\, d\mathbf{z}\right]. \]

We then apply Jensen’s inequality for the logarithm:

\[ \log \left[\int q(\mathbf{z}) \frac{Pr(\mathbf{x}, \mathbf{z} | \boldsymbol{\phi})}{q(\mathbf{z})}\, d\mathbf{z}\right] \geq \int q(\mathbf{z}) \log \left[\frac{Pr(\mathbf{x}, \mathbf{z} | \boldsymbol{\phi})}{q(\mathbf{z})}\right] d\mathbf{z}. \]

The right-hand side is called the Evidence Lower Bound (ELBO). In practice, the distribution \(q(\mathbf{z})\) has its own parameters \(\boldsymbol{\theta}\), so the ELBO can be written as:

\[ \text{ELBO}[\boldsymbol{\theta}, \boldsymbol{\phi}] = \int q(\mathbf{z} | \boldsymbol{\theta}) \log \left[\frac{Pr(\mathbf{x}, \mathbf{z} | \boldsymbol{\phi})}{q(\mathbf{z} | \boldsymbol{\theta})}\right] d\mathbf{z}. \]

The name comes from the fact that \(Pr(\mathbf{x} | \boldsymbol{\phi})\) is called the evidence in the context of Bayes’ rule.

ImportantKey Result

For any distribution \(q(\mathbf{z} | \boldsymbol{\theta})\), we have:

\[ \log Pr(\mathbf{x} | \boldsymbol{\phi}) \geq \text{ELBO}[\boldsymbol{\theta}, \boldsymbol{\phi}] = \int q(\mathbf{z} | \boldsymbol{\theta}) \log \left[\frac{Pr(\mathbf{x}, \mathbf{z} | \boldsymbol{\phi})}{q(\mathbf{z} | \boldsymbol{\theta})}\right] d\mathbf{z}. \]

By maximising the ELBO with respect to both \(\boldsymbol{\theta}\) and \(\boldsymbol{\phi}\), we push the log-likelihood upward. The ELBO is tight (equals the log-likelihood) when \(q(\mathbf{z} | \boldsymbol{\theta}) = Pr(\mathbf{z} | \mathbf{x}, \boldsymbol{\phi})\), the true posterior.

The ELBO as Reconstruction Minus KL Divergence

The ELBO can be decomposed into two interpretable terms. Starting from the definition and factoring \(Pr(\mathbf{x}, \mathbf{z} | \boldsymbol{\phi}) = Pr(\mathbf{x} | \mathbf{z}, \boldsymbol{\phi}) \cdot Pr(\mathbf{z})\):

\[ \begin{align} \text{ELBO}[\boldsymbol{\theta}, \boldsymbol{\phi}] &= \int q(\mathbf{z} | \boldsymbol{\theta}) \log \left[\frac{Pr(\mathbf{x} | \mathbf{z}, \boldsymbol{\phi}) \cdot Pr(\mathbf{z})}{q(\mathbf{z} | \boldsymbol{\theta})}\right] d\mathbf{z} \\ &= \int q(\mathbf{z} | \boldsymbol{\theta}) \log\!\left[Pr(\mathbf{x} | \mathbf{z}, \boldsymbol{\phi})\right] d\mathbf{z} + \int q(\mathbf{z} | \boldsymbol{\theta}) \log \left[\frac{Pr(\mathbf{z})}{q(\mathbf{z} | \boldsymbol{\theta})}\right] d\mathbf{z} \\ &= \underbrace{\int q(\mathbf{z} | \boldsymbol{\theta}) \log\!\left[Pr(\mathbf{x} | \mathbf{z}, \boldsymbol{\phi})\right] d\mathbf{z}}_{\text{Reconstruction term}} - \underbrace{\text{D}_{KL}\!\left[q(\mathbf{z} | \boldsymbol{\theta})\, \|\, Pr(\mathbf{z})\right]}_{\text{KL regularisation term}}. \end{align} \]

The two terms have clear interpretations:

  1. Reconstruction term: Measures the average log-likelihood of the data \(\mathbf{x}\) under the decoder, when the latent code is drawn from \(q\). This encourages the decoder to reconstruct the data accurately.

  2. KL regularisation term: Measures how far the approximate posterior \(q(\mathbf{z} | \boldsymbol{\theta})\) deviates from the prior \(Pr(\mathbf{z})\). This encourages the encoder to produce latent distributions that are close to the standard normal prior.

Training by Maximising the ELBO

To learn the nonlinear latent variable model, we maximise the ELBO as a function of both the decoder parameters \(\boldsymbol{\phi}\) and the encoder parameters \(\boldsymbol{\theta}\). The neural architecture that computes the ELBO is the variational autoencoder.

We can increase the ELBO (and hence the log-likelihood) by:

  • Improving the encoder (changing \(\boldsymbol{\theta}\)): making the approximate posterior \(q(\mathbf{z} | \mathbf{x}, \boldsymbol{\theta})\) a better approximation to the true posterior \(Pr(\mathbf{z} | \mathbf{x}, \boldsymbol{\phi})\). This tightens the bound.
  • Improving the decoder (changing \(\boldsymbol{\phi}\)): making the model assign higher probability to the training data.

The Reparameterization Trick

There is one more complication: the VAE involves a sampling step in the middle of the network. The encoder outputs the parameters \(\boldsymbol{\mu}\) and \(\boldsymbol{\Sigma}\) of the variational distribution \(q(\mathbf{z} | \mathbf{x}, \boldsymbol{\theta})\), and then we must draw a sample \(\mathbf{z}^*\) from this distribution to pass through the decoder. But sampling is a stochastic operation, and we cannot easily backpropagate gradients through it.

The reparameterization trick solves this by moving the stochasticity to a separate branch. Instead of sampling directly from \(q(\mathbf{z} | \mathbf{x}, \boldsymbol{\theta}) = \text{Norm}_{\mathbf{z}}[\boldsymbol{\mu}, \boldsymbol{\Sigma}]\), we:

  1. Draw a noise sample \(\boldsymbol{\epsilon}^* \sim \text{Norm}_{\boldsymbol{\epsilon}}[\mathbf{0}, \mathbf{I}]\).
  2. Compute \(\mathbf{z}^* = \boldsymbol{\mu} + \boldsymbol{\Sigma}^{1/2} \boldsymbol{\epsilon}^*\).

The result \(\mathbf{z}^*\) has the same distribution as a direct sample from \(q(\mathbf{z} | \mathbf{x}, \boldsymbol{\theta})\), but now \(\mathbf{z}^*\) is a deterministic, differentiable function of \(\boldsymbol{\mu}\) and \(\boldsymbol{\Sigma}\) (given \(\boldsymbol{\epsilon}^*\)). This means the backpropagation algorithm does not need to pass through the stochastic sampling operation — it flows through the deterministic path \(\boldsymbol{\mu} + \boldsymbol{\Sigma}^{1/2} \boldsymbol{\epsilon}^*\) instead.

ImportantImportant

Reparameterization Trick: Instead of sampling \(\mathbf{z}^* \sim \mathcal{N}(\boldsymbol{\mu}, \boldsymbol{\Sigma})\), we sample \(\boldsymbol{\epsilon}^* \sim \mathcal{N}(\mathbf{0}, \mathbf{I})\) and compute \(\mathbf{z}^* = \boldsymbol{\mu} + \boldsymbol{\Sigma}^{1/2} \boldsymbol{\epsilon}^*\). This makes the sampling step differentiable with respect to the encoder parameters \(\boldsymbol{\theta}\), enabling end-to-end training with backpropagation.


The Complete VAE

We can now describe the full variational autoencoder architecture and its training procedure.

The ELBO Objective for the VAE

Combining the variational approximation \(q(\mathbf{z} | \mathbf{x}, \boldsymbol{\theta})\) with the reconstruction-KL decomposition, the ELBO for a single data point \(\mathbf{x}\) is:

\[ \text{ELBO}[\boldsymbol{\theta}, \boldsymbol{\phi}] = \underbrace{\int q(\mathbf{z} | \mathbf{x}, \boldsymbol{\theta}) \log\!\left[Pr(\mathbf{x} | \mathbf{z}^*, \boldsymbol{\phi})\right] d\mathbf{z}}_{\text{Reconstruction term}} - \underbrace{\text{D}_{KL}\!\left[q(\mathbf{z} | \mathbf{x}, \boldsymbol{\theta})\, \|\, Pr(\mathbf{z})\right]}_{\text{KL term}}. \]

The encoder \(\mathbf{g}[\mathbf{x}, \boldsymbol{\theta}]\) parameterises \(q(\mathbf{z} | \mathbf{x}, \boldsymbol{\theta})\), and the decoder \(\mathbf{f}[\mathbf{z}, \boldsymbol{\phi}]\) parameterises \(Pr(\mathbf{x} | \mathbf{z}, \boldsymbol{\phi})\). Both sets of parameters are optimised jointly.

Computing the Two Terms During Training

Term 1: Reconstruction. The first term is an expectation with respect to \(q(\mathbf{z} | \mathbf{x}, \boldsymbol{\theta})\). Since this is an integral, we approximate it using a Monte Carlo estimate with a single sample \(\mathbf{z}^*\) (drawn using the reparameterization trick):

\[ \int q(\mathbf{z} | \mathbf{x}, \boldsymbol{\theta}) \log\!\left[Pr(\mathbf{x} | \mathbf{z}, \boldsymbol{\phi})\right] d\mathbf{z} \approx \log\!\left[Pr(\mathbf{x} | \mathbf{z}^*, \boldsymbol{\phi})\right]. \]

In practice, this reduces to computing the reconstruction loss (e.g., mean squared error between \(\mathbf{x}\) and the decoder output \(\mathbf{f}[\mathbf{z}^*, \boldsymbol{\phi}]\)).

Term 2: KL divergence. The second term is the KL divergence between the encoder output \(q(\mathbf{z} | \mathbf{x}, \boldsymbol{\theta}) = \text{Norm}_{\mathbf{z}}[\boldsymbol{\mu}, \boldsymbol{\Sigma}]\) and the prior \(Pr(\mathbf{z}) = \text{Norm}_{\mathbf{z}}[\mathbf{0}, \mathbf{I}]\). For two normal distributions where one is the standard normal, this has a closed-form expression:

\[ \text{D}_{KL}\!\left[q(\mathbf{z} | \mathbf{x}, \boldsymbol{\theta})\, \|\, Pr(\mathbf{z})\right] = \frac{1}{2} \left(\text{Tr}[\boldsymbol{\Sigma}] + \boldsymbol{\mu}^T \boldsymbol{\mu} - D_{\mathbf{z}} - \log\!\left[\det[\boldsymbol{\Sigma}]\right]\right), \]

where \(D_{\mathbf{z}}\) is the dimensionality of the latent space. No sampling is needed for this term.

The VAE Training Algorithm

To summarise, for each training example \(\mathbf{x}\), one forward pass of the VAE proceeds as follows:

  1. Encode: Pass \(\mathbf{x}\) through the encoder \(\mathbf{g}[\mathbf{x}, \boldsymbol{\theta}]\) to obtain the mean \(\boldsymbol{\mu}\) and covariance \(\boldsymbol{\Sigma}\) of the variational distribution \(q(\mathbf{z} | \mathbf{x}, \boldsymbol{\theta})\).

  2. Sample (reparameterize): Draw \(\boldsymbol{\epsilon}^* \sim \mathcal{N}(\mathbf{0}, \mathbf{I})\) and compute \(\mathbf{z}^* = \boldsymbol{\mu} + \boldsymbol{\Sigma}^{1/2} \boldsymbol{\epsilon}^*\).

  3. Decode: Pass \(\mathbf{z}^*\) through the decoder \(\mathbf{f}[\mathbf{z}^*, \boldsymbol{\phi}]\) to obtain the reconstruction.

  4. Compute the loss: The loss is the negative ELBO:

\[ \mathcal{L} = -\text{ELBO}[\boldsymbol{\theta}, \boldsymbol{\phi}] \approx -\log\!\left[Pr(\mathbf{x} | \mathbf{z}^*, \boldsymbol{\phi})\right] + \text{D}_{KL}\!\left[q(\mathbf{z} | \mathbf{x}, \boldsymbol{\theta})\, \|\, Pr(\mathbf{z})\right]. \]

  1. Backpropagate and update: Compute gradients of the loss with respect to both \(\boldsymbol{\theta}\) and \(\boldsymbol{\phi}\) using backpropagation (through the reparameterization trick), and update parameters using SGD or Adam.
Show code
import matplotlib.pyplot as plt
import matplotlib.patches as mpatches

def draw_box(ax, xy, w, h, text, color="#4A90D9", fontsize=9, text_color="white"):
    rect = mpatches.FancyBboxPatch(xy, w, h, boxstyle="round,pad=0.06",
                                    facecolor=color, edgecolor="black", linewidth=1.2)
    ax.add_patch(rect)
    ax.text(xy[0] + w/2, xy[1] + h/2, text, ha="center", va="center",
            fontsize=fontsize, fontweight="bold", color=text_color)

def draw_arrow(ax, start, end, **kwargs):
    ax.annotate("", xy=end, xytext=start,
                arrowprops=dict(arrowstyle="-|>", color="black", lw=1.5, **kwargs))

fig, ax = plt.subplots(figsize=(12, 4))
ax.set_xlim(-0.5, 15)
ax.set_ylim(-1.5, 4.0)
ax.set_aspect("equal")
ax.axis("off")
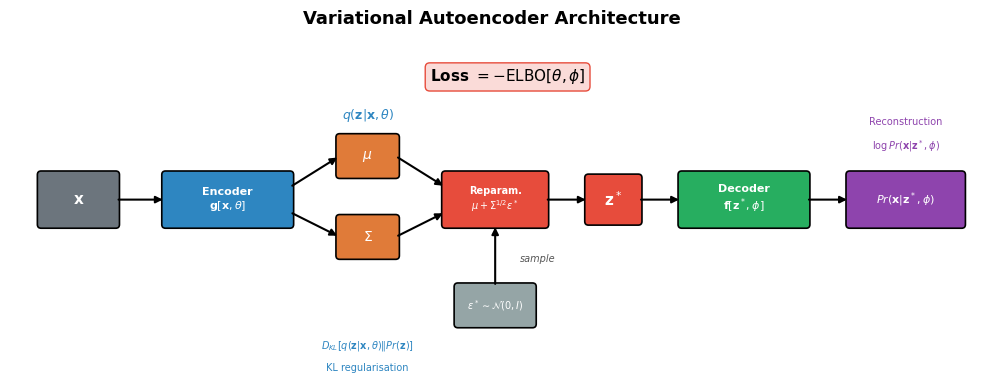
ax.set_title("Variational Autoencoder Architecture", fontsize=13, fontweight="bold", pad=10)

# Input x
draw_box(ax, (0, 1.0), 1.2, 0.8, r"$\mathbf{x}$", color="#6C757D", fontsize=11)

# Encoder
draw_box(ax, (2.0, 1.0), 2.0, 0.8, "Encoder\n$\\mathbf{g}[\\mathbf{x}, \\theta]$",
         color="#2E86C1", fontsize=8)
draw_arrow(ax, (1.2, 1.4), (2.0, 1.4))

# mu and Sigma outputs
draw_box(ax, (4.8, 1.8), 0.9, 0.6, r"$\mu$", color="#E07B39", fontsize=10)
draw_box(ax, (4.8, 0.5), 0.9, 0.6, r"$\Sigma$", color="#E07B39", fontsize=10)
draw_arrow(ax, (4.0, 1.6), (4.8, 2.1))
draw_arrow(ax, (4.0, 1.2), (4.8, 0.8))

# q(z|x,theta) label
ax.text(5.25, 2.7, r"$q(\mathbf{z}|\mathbf{x}, \theta)$", ha="center", fontsize=9,
        style="italic", color="#2E86C1")

# Reparameterization
draw_box(ax, (6.5, 1.0), 1.6, 0.8, "Reparam.\n$\\mu + \\Sigma^{1/2}\\epsilon^*$",
         color="#E74C3C", fontsize=7)
draw_arrow(ax, (5.7, 2.1), (6.5, 1.6))
draw_arrow(ax, (5.7, 0.8), (6.5, 1.2))

# Epsilon noise
draw_box(ax, (6.7, -0.6), 1.2, 0.6, "$\\epsilon^* \\sim \\mathcal{N}(0,I)$",
         color="#95A5A6", fontsize=7)
draw_arrow(ax, (7.3, 0.0), (7.3, 1.0))
ax.text(7.7, 0.4, "sample", fontsize=7, style="italic", color="#555")

# z*
draw_box(ax, (8.8, 1.05), 0.8, 0.7, r"$\mathbf{z}^*$", color="#E74C3C", fontsize=11)
draw_arrow(ax, (8.1, 1.4), (8.8, 1.4))

# Decoder
draw_box(ax, (10.3, 1.0), 2.0, 0.8, "Decoder\n$\\mathbf{f}[\\mathbf{z}^*, \\phi]$",
         color="#27AE60", fontsize=8)
draw_arrow(ax, (9.6, 1.4), (10.3, 1.4))

# Reconstruction
draw_box(ax, (13.0, 1.0), 1.8, 0.8,
         "$Pr(\\mathbf{x}|\\mathbf{z}^*, \\phi)$",
         color="#8E44AD", fontsize=8)
draw_arrow(ax, (12.3, 1.4), (13.0, 1.4))

# Loss function label at top
ax.text(7.5, 3.3, r"Loss $= -\mathrm{ELBO}[\theta, \phi]$",
        ha="center", fontsize=11, fontweight="bold",
        bbox=dict(boxstyle="round,pad=0.3", facecolor="#FADBD8", edgecolor="#E74C3C"))

# Annotations for loss terms
ax.text(13.9, 2.2, r"$\log Pr(\mathbf{x}|\mathbf{z}^*, \phi)$",
        ha="center", fontsize=7, color="#8E44AD", style="italic")
ax.text(13.9, 2.6, "Reconstruction", ha="center", fontsize=7, color="#8E44AD")

ax.text(5.25, -1.0, r"$D_{KL}[q(\mathbf{z}|\mathbf{x},\theta) \| Pr(\mathbf{z})]$",
        ha="center", fontsize=7, color="#2E86C1", style="italic")
ax.text(5.25, -1.35, "KL regularisation", ha="center", fontsize=7, color="#2E86C1")

fig.tight_layout()
plt.show()

NoneAlgorithm

VAE Training (one step)

Given a mini-batch of data \(\{\mathbf{x}_1, \dots, \mathbf{x}_B\}\):

  1. For each \(\mathbf{x}_i\), compute \(\boldsymbol{\mu}_i, \boldsymbol{\Sigma}_i = \mathbf{g}[\mathbf{x}_i, \boldsymbol{\theta}]\) (encoder).
  2. Sample \(\boldsymbol{\epsilon}_i^* \sim \mathcal{N}(\mathbf{0}, \mathbf{I})\) and set \(\mathbf{z}_i^* = \boldsymbol{\mu}_i + \boldsymbol{\Sigma}_i^{1/2} \boldsymbol{\epsilon}_i^*\) (reparameterize).
  3. Compute \(\hat{\mathbf{x}}_i = \mathbf{f}[\mathbf{z}_i^*, \boldsymbol{\phi}]\) (decoder).
  4. Compute loss: \(\displaystyle \mathcal{L} = \frac{1}{B} \sum_{i=1}^{B} \left[-\log Pr(\mathbf{x}_i | \mathbf{z}_i^*, \boldsymbol{\phi}) + \text{D}_{KL}[q(\mathbf{z} | \mathbf{x}_i, \boldsymbol{\theta}) \| Pr(\mathbf{z})]\right]\).
  5. Update \(\boldsymbol{\theta}, \boldsymbol{\phi}\) via gradient descent on \(\mathcal{L}\).

Generative Process Using VAE

Once the VAE has been trained, it can be used for several generative tasks. We present the key applications described in Section 17.8 of the reference text.

Generation

The most straightforward application is generating new data. Since the VAE has learned a probabilistic model, we can sample from it:

  1. Draw \(\mathbf{z} \sim Pr(\mathbf{z}) = \mathcal{N}(\mathbf{0}, \mathbf{I})\) from the prior.
  2. Pass \(\mathbf{z}\) through the trained decoder \(\mathbf{f}[\mathbf{z}, \boldsymbol{\phi}]\) to obtain the mean of the output distribution.
  3. (Optionally) add noise from \(Pr(\mathbf{x} | \mathbf{z}, \boldsymbol{\phi})\).

Samples from vanilla VAEs tend to be smooth but somewhat blurry, particularly for image data. This is partly due to the spherical Gaussian noise model and partly because the Gaussian variational approximation may not capture all the structure of the true posterior. Modern VAEs using hierarchical priors, specialised architectures, and careful regularisation can produce much higher-quality samples.

One technique to improve generation quality is to sample from the aggregated posterior \(q(\mathbf{z} | \boldsymbol{\theta}) = \frac{1}{I} \sum_i q(\mathbf{z} | \mathbf{x}_i, \boldsymbol{\theta})\) rather than the prior. This is a mixture of Gaussians that more accurately represents the true distribution of latent codes used during training.

Approximating Sample Probability

Although \(Pr(\mathbf{x})\) is intractable to compute exactly, it can be approximated using importance sampling. The key idea is:

\[ Pr(\mathbf{x}) = \int Pr(\mathbf{x} | \mathbf{z}) Pr(\mathbf{z})\, d\mathbf{z} = \int \frac{Pr(\mathbf{x} | \mathbf{z}) Pr(\mathbf{z})}{q(\mathbf{z})} q(\mathbf{z})\, d\mathbf{z} = \mathbb{E}_{q(\mathbf{z})} \left[\frac{Pr(\mathbf{x} | \mathbf{z}) Pr(\mathbf{z})}{q(\mathbf{z})}\right] \approx \frac{1}{N} \sum_{n=1}^{N} \frac{Pr(\mathbf{x} | \mathbf{z}_n) Pr(\mathbf{z}_n)}{q(\mathbf{z}_n)}, \]

where \(\mathbf{z}_n\) are drawn from \(q(\mathbf{z})\). A natural choice for \(q(\mathbf{z})\) is the variational posterior \(q(\mathbf{z} | \mathbf{x})\) computed by the encoder, since it concentrates samples in the region of latent space that is most relevant for \(\mathbf{x}\).

This is useful for anomaly detection: data points with low estimated probability may be outliers.

Resynthesis

VAEs can also be used to modify existing data. A data point \(\mathbf{x}\) is projected into the latent space using the encoder (taking the mean of the predicted distribution), manipulated in latent space, and then decoded.

For example, with face images:

  • Encode images labelled as “neutral” and “smiling” to find the mean latent codes for each group.
  • Compute the “smile vector” as the difference between the group means.
  • Add this vector to the latent code of a new face to make it appear smiling.

This process of encoding, modifying, and decoding is known as resynthesis. To generate smooth intermediate images, spherical linear interpolation (Slerp) is used rather than ordinary linear interpolation in the latent space.

Disentanglement

A desirable property of the latent space is disentanglement — where each dimension of \(\mathbf{z}\) corresponds to an independent, interpretable factor of variation in the data. For face images, we might want one dimension to control head pose, another to control hair colour, and so on.

The standard VAE does not guarantee disentanglement. However, variants such as the beta-VAE up-weight the KL term to encourage independence between latent dimensions:

\[ \text{ELBO}[\boldsymbol{\theta}, \boldsymbol{\phi}] \approx \log\!\left[Pr(\mathbf{x} | \mathbf{z}^*, \boldsymbol{\phi})\right] - \beta \cdot \text{D}_{KL}\!\left[q(\mathbf{z} | \mathbf{x}, \boldsymbol{\theta})\, \|\, Pr(\mathbf{z})\right], \]

where \(\beta > 1\). Since the prior \(Pr(\mathbf{z})\) is a standard normal with independent dimensions, increasing the weight on the KL term encourages the posterior to also have independent (uncorrelated) dimensions, promoting disentanglement.

NoteDefinition

Key VAE Applications:

Application Description
Generation Sample \(\mathbf{z} \sim \mathcal{N}(\mathbf{0}, \mathbf{I})\), decode to produce new data
Probability estimation Approximate \(Pr(\mathbf{x})\) via importance sampling for anomaly detection
Resynthesis Encode, modify latent code, decode to edit existing data
Disentanglement Learn latent dimensions that correspond to interpretable data factors

Summary

In this lesson, we have built the variational autoencoder from the ground up:

  1. We started with autoencoders as a tool for unsupervised dimensionality reduction and explained why their deterministic bottleneck is insufficient for generation.
  2. We introduced latent variable models and showed how a simple example — the mixture of Gaussians — can model complex distributions through a hidden variable, with training performed without labels.
  3. We defined the nonlinear latent variable model with a continuous latent space, a standard normal prior, and a deep network decoder.
  4. We showed that the true training objective (maximum likelihood) is intractable and derived the Evidence Lower Bound (ELBO) using Jensen’s inequality.
  5. We decomposed the ELBO into a reconstruction term and a KL regularisation term, each with a clear interpretation.
  6. We introduced the reparameterization trick to enable gradient-based training through the stochastic sampling step.
  7. We described the complete VAE architecture and training algorithm.
  8. We presented applications including generation, probability estimation, resynthesis, and disentanglement.

The VAE provides a principled probabilistic framework for generative modeling. Its ideas — latent variables, variational inference, the ELBO — are foundational concepts that reappear in more advanced generative models, including diffusion models.

References

  1. Simon J.D. Prince, “Understanding Deep Learning”, Chapter 17: Variational Autoencoders,